Garage door opener force adjustment is the process of calibrating how much motor power your opener uses to lift and lower the door. Known in the industry as force sensitivity settings, these controls are split into two separate functions: Up Force and Down Force. Brands like LiftMaster, Chamberlain, and Genie build these controls into every residential opener because federal safety standards require auto-reverse systems to respond accurately to obstructions. Getting the force adjustment garage opener explained properly means understanding that these settings directly control whether your door stops safely or becomes a hazard.
What is garage door opener force adjustment?
Residential garage door openers have separate Up Force and Down Force controls that regulate motor power independently for each direction of travel. Up Force controls how hard the motor works to lift the door. Down Force controls how much pressure the motor applies when closing. These are not the same setting, and adjusting one does not affect the other.
The reason two separate controls exist is practical. A door needs more pulling power to lift against gravity than it needs to close with gravity assisting. If both directions used the same force level, the opener would either strain on the way up or slam shut on the way down. Separate controls let you dial in each direction precisely.
Proper force calibration ensures the opener’s safety-reversal triggers accurately. When Down Force is set too high, the door will not reverse when it hits an obstruction. That is the scenario federal safety regulations are designed to prevent. When Down Force is too low, the door reverses with no obstruction present, which is equally frustrating and signals a different problem.
How do you find the force controls on your opener?
Locating the force adjustment controls depends on your opener model, but the controls follow predictable patterns across most brands.
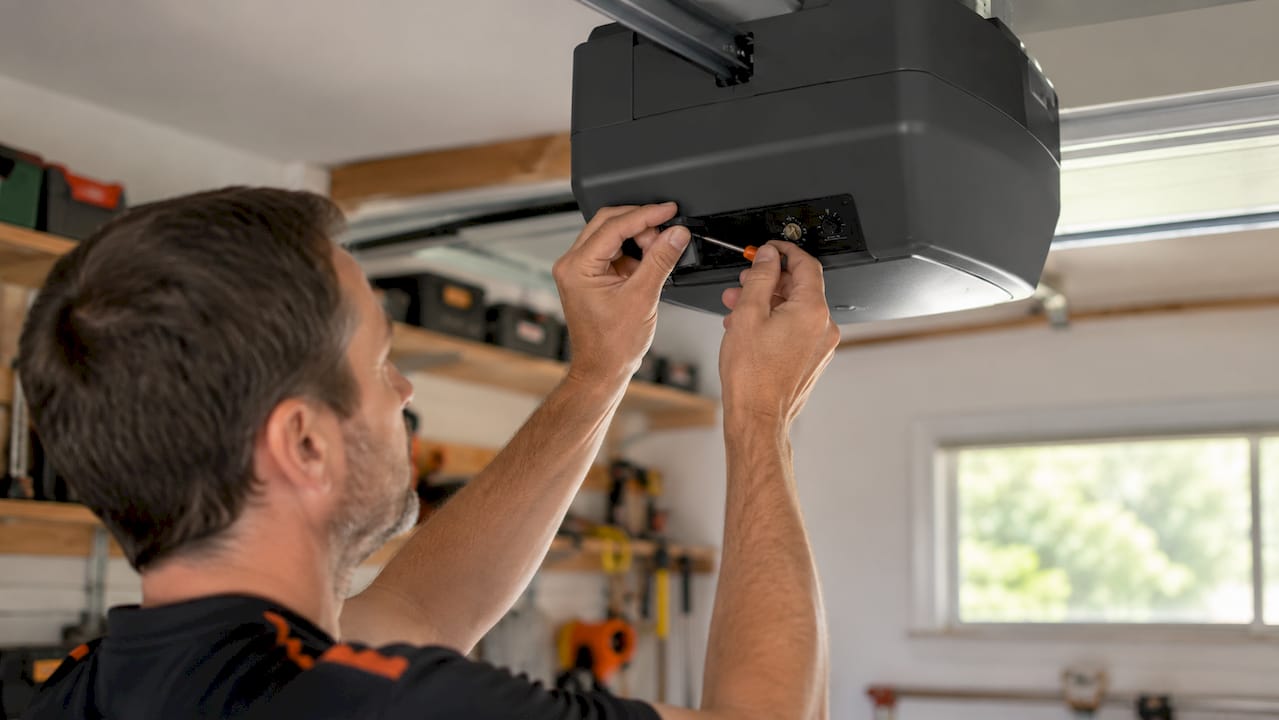
On older and mid-range openers, the controls are physical dials or screws mounted directly on the motor housing. Look for them in these locations:
- On the back panel of the motor unit, near the light cover
- On the side of the motor housing, sometimes behind a removable plastic panel
- Under the light lens cover, labeled with arrows or the words “Up Force” and “Down Force”
On newer digital openers, including many LiftMaster 8500W and Chamberlain B6765 models, force settings live inside an on-board menu. You access them through a button sequence on the motor unit itself, not through a physical dial.
For Genie models, force adjustments are typically manual dial adjustments tested iteratively rather than digital programming steps. You turn the dial, reconnect power, and test the door. The process is straightforward but requires patience.
Pro Tip: Pull out your opener’s manual before touching any controls. Every brand labels these dials differently. LiftMaster uses “Force” with up and down arrows. Genie models sometimes use “Open Force” and “Close Force.” Knowing your exact labels prevents you from adjusting the wrong setting.
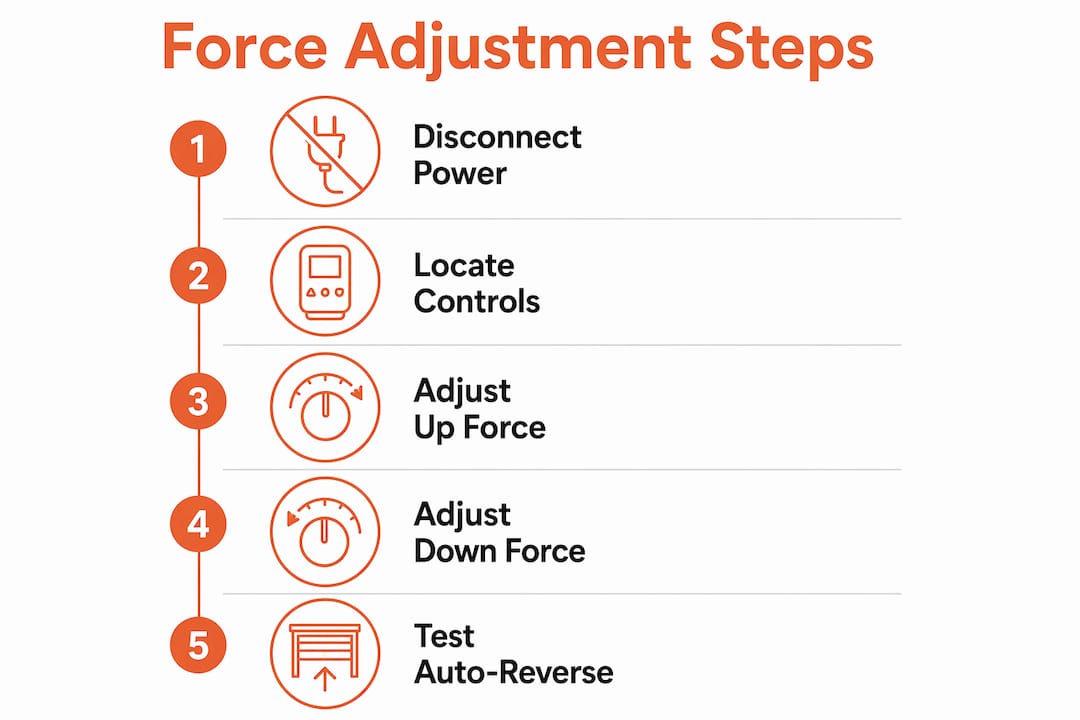
Always disconnect power before removing any cover panels. Once you have located the controls and identified the labels, you are ready to make adjustments.
How to adjust up force and down force step by step
The force adjustment procedure follows the same logic across LiftMaster, Chamberlain, Genie, and most other residential brands. Work through these steps carefully.
-
Test the door manually first. Pull the emergency release cord and lift the door by hand to the halfway point. A balanced door stays in place without drifting up or down. If it falls or flies up, you have a spring or cable issue. Force adjustment will not fix that. Stop and call a technician.
-
Reconnect the opener and identify the problem direction. Is the door struggling to open, stopping short, or reversing when closing? Identify whether Up Force or Down Force needs attention before touching anything.
-
Make a small adjustment. Adjust force in small increments like quarter-turns to avoid overshooting the target. On digital openers, move one step at a time. Clockwise typically increases force. Counterclockwise decreases it. Confirm the direction in your manual before turning.
-
Run a full open and close test cycle. Operate the door through one complete cycle after every single adjustment. Watch for smooth travel, no hesitation, and full travel to both the open and closed positions.
-
Perform the 2×4 obstruction test for Down Force. Place a 2×4 flat on the ground in the door’s path. Close the door. The door must reverse promptly upon contact with the 2×4. If it does not reverse, reduce Down Force and retest immediately. This test is not optional.
-
Repeat until the door passes. Continue making quarter-turn adjustments and testing until the door opens fully, closes fully, and reverses on the 2×4 every time.
Pro Tip: Force setting changes can appear successful when opening but fail safety tests on closing. Always prioritize the Down Force auto-reverse test. A door that opens smoothly but fails the 2×4 test is still a safety hazard.
What symptoms signal incorrect force settings?
Recognizing the signs of a force problem saves you from chasing the wrong fix. Here are the most common symptoms and their likely causes.
| Symptom | Likely Cause |
|---|---|
| Door reverses immediately when closing | Down Force too low, or travel limits set incorrectly |
| Door stops short before fully opening | Up Force too low |
| Door slams shut on closing | Down Force too high |
| Door stalls midway and reverses | Up Force too low, or mechanical obstruction |
| Door fails to reverse on 2×4 test | Down Force too high, creating a safety hazard |
If the door reverses immediately upon closing with no obstruction present, the cause is often Down Force set too low or travel limits that are off. The opener interprets the floor as an obstruction because the door is not traveling far enough before the motor cuts out. This is a travel limit problem as much as a force problem, and both may need adjustment together.
Incorrect force settings cause false safe reversals when too sensitive, or failure to reverse when force is too high. Both outcomes are problems. One is a nuisance. The other is a genuine safety risk.
There are also symptoms that force adjustment simply cannot fix. A door that is mechanically imbalanced or has sensor misalignment needs mechanical repair, not a force tweak. Worn springs, frayed cables, bent tracks, and misaligned photo-eye sensors all produce symptoms that look like force problems but are not. Check for warning signs of deeper issues before assuming force adjustment is the answer.
If the auto-reverse test fails after adjustment, stop and seek professional repair rather than continuing to increase force. Pushing force higher to compensate for a mechanical problem increases the risk of injury and damage significantly.
How do you keep force settings optimal over time?
Force settings do not stay perfect forever. Seasonal temperature changes, normal wear on rollers and springs, and track buildup all affect how much force the opener needs. A door that passed every test in spring may start struggling in a Texas August.
Here are the maintenance practices that keep your force settings accurate:
- Test the 2×4 auto-reverse function monthly. Monthly testing of the auto-reverse safety function is federally required for residential garage doors, and the door should reverse within about 2 seconds of contacting the obstruction. Set a calendar reminder and do not skip it.
- Check photo-eye sensor alignment every month. Wipe the lenses with a dry cloth and confirm both sensors show solid indicator lights. A blinking light means misalignment or obstruction.
- Lubricate rollers, hinges, and tracks twice a year. Use a silicone-based lubricant or white lithium grease. A well-lubricated door requires less force to move, which means your current settings stay accurate longer.
- Test door balance quarterly. Pull the emergency release and lift the door manually to the halfway point. It should hold position without help. If it does not, check your door balance and address any spring issues before adjusting force.
- Never raise force to mask a mechanical problem. Excessive force can hide worn springs or misaligned tracks, increasing safety hazards rather than solving them. If you keep needing to increase force, the door has a mechanical problem that needs repair.
Pro Tip: Many openers have factory-programmed force settings learned during initial setup. If you find yourself adjusting force frequently, that pattern signals a maintenance need, not a calibration problem. Frequent readjustment requests often mean the door needs a tune-up, not another turn of the dial.
Key takeaways
Correct force adjustment on a garage door opener requires separate calibration of Up Force and Down Force, with the 2×4 auto-reverse test serving as the non-negotiable safety checkpoint after every change.
| Point | Details |
|---|---|
| Two separate controls exist | Up Force and Down Force are independent settings that must be adjusted individually. |
| Always test door balance first | A door that fails the manual balance test has a spring issue, not a force issue. |
| Adjust in small increments | Quarter-turn adjustments prevent overshooting and create more predictable results. |
| The 2×4 test is mandatory | Down Force must trigger an auto-reverse on contact with a 2×4 obstruction every time. |
| Force cannot fix mechanical faults | Worn springs, bad cables, and misaligned sensors require repair, not force increases. |
Why i think most homeowners adjust force in the wrong direction
I have seen the same mistake repeated more times than I can count. A homeowner notices the door is struggling to close fully, so they increase Down Force. The door closes. Problem solved, right? Not even close.
What actually happened is that the door had a mechanical problem, worn rollers, a slightly bent track, or a spring that lost tension, and the higher force setting is now masking it. The door works, but the opener is working harder than it should. Six months later, the opener burns out early, or the door comes off track, and now the repair bill is three times what it would have been.
The correct sequence is always: check balance first, check lubrication second, check sensor alignment third, and only then consider force adjustment. Force is the last variable to touch, not the first.
The other thing I want homeowners to understand is that the 2×4 test is not a formality. It is the only real-world check you have that your door will not injure a child, a pet, or you. Run it every month. It takes 30 seconds. There is no good reason to skip it.
If you adjust force in both directions and the door still fails the 2×4 test, put the screwdriver down. That door needs a professional, not another quarter-turn.
— Oded
When force adjustment is not enough
Sometimes the door has a deeper problem that no amount of dial-turning will fix. Springs lose tension. Cables fray. Tracks shift. When that happens, force adjustment becomes a temporary patch on a problem that is getting worse.
Edge garage doors serves homeowners across Austin, Cedar Park, and Central Texas with honest diagnostics and precise force calibration as part of every service visit. The technicians check springs, cables, sensors, and track alignment before touching a single force setting. If you are not sure whether your door needs a tune-up or something more, the repair vs. replace guide on the Edge garage doors website walks you through exactly what to look for. For hands-on help, garage door repair in Austin is one call away.
FAQ
What does force adjustment do on a garage door opener?
Force adjustment controls how much motor power the opener uses to lift and lower the door. Separate Up Force and Down Force settings let you calibrate each direction independently for safe, smooth operation.
How do i know if my garage door force is set too high?
The clearest sign is a door that fails the 2×4 auto-reverse test. If the door does not reverse when it contacts a 2×4 flat on the ground, Down Force is set too high and must be reduced immediately.
Can i adjust garage door opener force myself?
Yes, most homeowners can adjust force settings using a screwdriver and their opener’s manual. Always test door balance manually first and run the 2×4 safety test after every adjustment.
Why does my garage door reverse before it closes all the way?
A door that reverses prematurely usually has Down Force set too low or travel limits that are off. The opener interprets the floor as an obstruction because the door stops short of its full travel distance.
How often should i test my garage door’s auto-reverse function?
Monthly testing of the auto-reverse safety function is federally required for residential garage doors. Place a 2×4 flat on the ground in the door’s path and confirm the door reverses within about 2 seconds of contact.